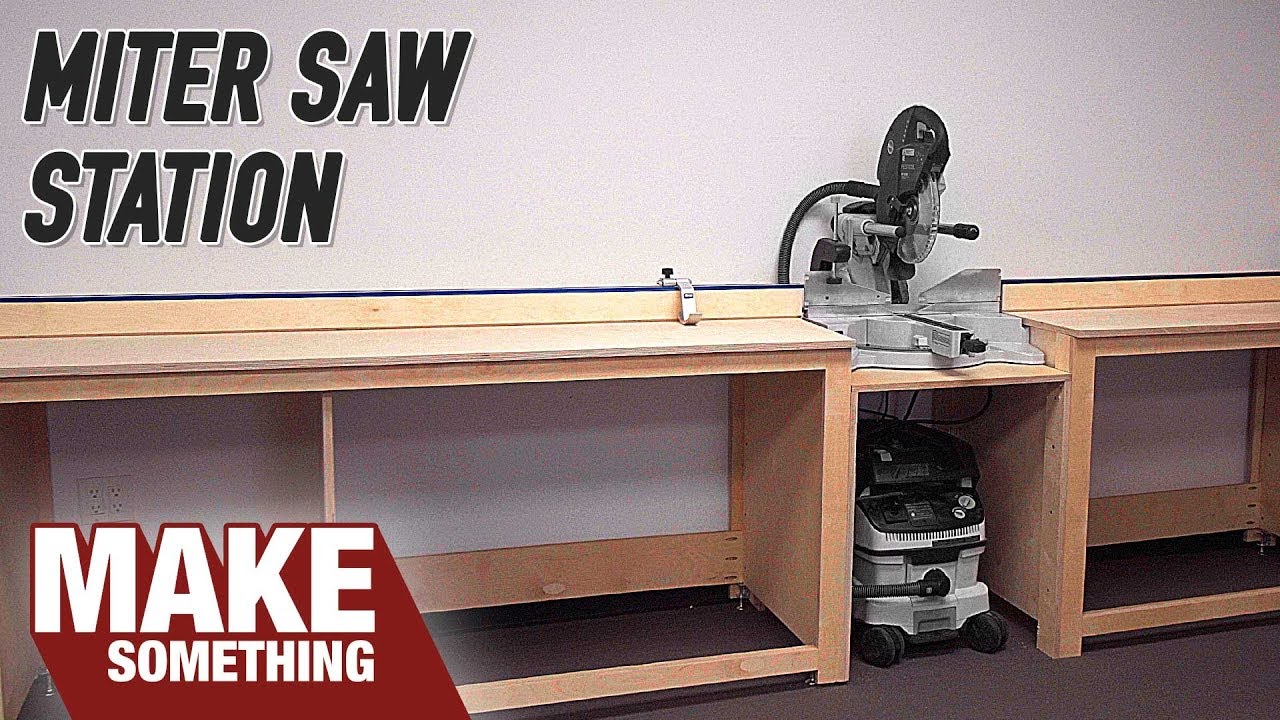
Building a miter saw table is a great way to get the most out of your miter saw. By building a dedicated table, you can ensure that your saw is always at the proper height and angle, which will lead to better cuts. In addition, a miter saw table can be used as an outfeed support for other woodworking operations such as planing and sanding.
To build a basic miter saw table, you will need a sheet of plywood or MDF (medium-density fiberboard), some 2x4s or similar lumber for the frame, and four caster wheels. You will also need a drill, screw gun, circular saw, and various clamps. Begin by cutting the plywood or MDF to size using the circular saw.
Then use the drill and screw gun to assemble the frame from the 2x4s. Once the frame is together, attach it to the plywood or MDF top with screws. Finally, add caster wheels to each corner of the frame so that it can be easily moved around your shop.
- Choose the location for your miter saw table
- Keep in mind that you will need access to electricity and a flat, level surface on which to assemble the table
- Cut two pieces of plywood to the desired size of your tabletop using a circular saw
- These will be the top and bottom panels of your table
- Cut four strips of wood to create the frame of the table
- The strips should be long enough to fit around the perimeter of the plywood panels, with additional length for attaching brackets (if desired)
- Assemble the frame by attaching the strips of wood together at the corners using screws or nails
- Be sure that the frame is square before proceeding
Miter Saw Table Plans Free
If you’re looking for a great way to add a miter saw to your woodworking shop, then you need to check out these free miter saw table plans! These plans will help you build a sturdy and functional miter saw table that will make it easy to get accurate cuts on all of your projects.
The first step in building your miter saw table is to cut the four legs to size.
You’ll want to use a 2×4 for this, and cut them each to 24 inches in length. Once the legs are cut, it’s time to attach the stretchers. Cut two more 2x4s down to 36 inches in length and use screws or nails to attach them between the legs.
Now it’s time to add the top of the table. Cut a piece of plywood or MDF down to 24×36 inches and screw or nail it into place on top of the stretchers. Make sure that the top is flush with the tops of the legs so that your miter saw has a flat surface to work on.
Finally, add any additional features that you want on your table. This could include shelves for storing lumber or other materials, drawers for storing tools, or anything else that would be helpful in your shop. Once you’ve added all the features you want, sand everything down and finish it off with paint or stain before using it in your shop.
Credit: www.youtube.com
How Do You Make a Simple Miter Saw Table?
A miter saw is a handy tool for making cuts at a variety of angles. But if you don’t have a dedicated work space for it, your saw can quickly become an inconvenient addition to your shop. A simple miter saw table is the perfect solution.
By building a basic platform for your saw, you can easily break down lumber and other materials into the smaller pieces you need without having to move your saw around constantly.
Here’s how to build a simple miter saw table in just a few easy steps:
- Cut four legs to size from 2×4 lumber. Your legs should be about 24″ long, but you may need to adjust this depending on the height of your miter saw.
- Drill two pocket holes into each leg, using a Kreg Jig set for 2x4s. These pocket holes will be used to attach the legs to the tabletop later on.
- Cut two side rails and two cross supports from 2×4 lumber as well. Your side rails should be roughly 24″ long, while your cross supports should be cut to fit between the legs (taking into account the width of your miter saw blade).
- Assemble the frame by attaching the side rails to the legs with screws driven through the pocket holes . Then add the cross supports so that they’re flush with the top of the side rails . If everything lines up correctly ,your frame should now resemble something like an open rectangular box .
- Cut a piece of plywood or MDF board down to size for your tabletop . Your tabletop should be slightly larger than your frame , leaving about 1/2″ on all sides .
- Attach the table top to the frame by driving screws through the outside edges of the frame into the table top material .
What Kind of Table Do I Need for a Miter Saw?
If you’re looking to buy a miter saw, one of the first decisions you’ll need to make is what kind of table you need. Here’s a quick guide to help you choose the right table for your miter saw.
First, consider the size of your miter saw.
Miter saws come in two basic sizes: 10-inch and 12-inch. The size refers to the diameter of the blade, so a 10-inch miter saw has a blade that’s 10 inches in diameter, and a 12-inch miter saw has a blade that’s 12 inches in diameter.
The size of your miter saw will dictate the size of the table you need.
A 10-inch miter saw can be used with a standard 24×48 inch table, but a 12-inch miter saw will require a larger table, such as a 30×60 inch table.
Next, consider the type of materials you’ll be cutting. If you’re only going to be cutting wood, then any type of table will do.
However, if you’re planning on cutting other materials like metal or plastic, then you’ll need to get a specialized table that can handle those materials.
Finally, think about how much space you have available for your miter saw table. You don’t want something that’s too big or too small – it should be just right for your needs.
Once you’ve considered all these factors, it should be easy to find the perfecttable for yourm iter saw!
How to Make a Miter Saw Workbench?
A miter saw is a versatile tool that can be used for a variety of projects, including cutting crown molding, baseboards, and other trim. But in order to get the most out of your miter saw, you need a sturdy workbench that can support the weight of the saw and provide a stable surface for making cuts.
Here are some tips on how to build a miter saw workbench:
- Start with a solid foundation: The best way to do this is by using 4x4s or 6x6s for the legs of your workbench. If you’re not sure how big you want your workbench to be, start by measuring the length and width of your miter saw. Add at least 24 inches to each dimension so you’ll have plenty of room to work.
- Make sure the legs are level: Use a spirit level or laser level to make sure all four legs are exactly the same height. This will ensure that your workbench is nice and level when you put your miter saw on it.
- Attach crossbeams for extra stability: Once the legs are in place, add some 2x4s or 2x6s across the top for extra stability. You can either screw them into place or use lag bolts if you want something even more secure.
- Add plywood to create a flat surface: Place a sheet of 3/4-inch plywood over the frame of your workbench and screw it into place . This will give you a nice , flat surface to work on .
- Finish it off with some trim: Once the plywood is in place , add some finishing touches like edge banding or trim around the edges .
This will give your workbench a polished look and help keep wood chips from flying everywhere while you’re working .
Conclusion
This blog post teaches readers how to build a miter saw table. The first step is to gather the materials needed, which are listed in the article. Next, the author provides detailed instructions on how to cut and assemble the pieces of the table.
Finally, they offer tips on how to finish and decorate the table to make it look its best.